S-10 Forum banner

Project: Autocross S10

1 reading
91K views 742 replies 40 participants last post by  goes2fast  
#1 ·
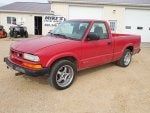
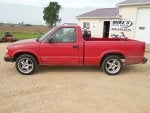
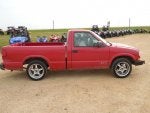
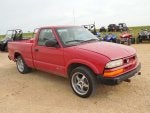
I finally have the majority of my parts rounded up and I'm ready to begin working on my truck. The goal is to have a truck that i can use for daily driving and be able to drive to the track and be competitive in my class at autocross events. Eventually this will involve an engine swap of some sort to get the power i will need, but for the time being i am mostly concerned with handling mods. I would like to preface this project with one statement...Function Over Form! The whole truck was well used by previous owners and therefore i got this truck really cheap. The engine runs good, the cab is really solid, and it gives me a base to start from. Being a budget build, this is all i really need. First thing i did was replace door pins and bushings. They had been gone a long time and i had to do some repairs on the hinges. At the time i wasn't thinking about starting a project thread, so no pictures of that. But i will post up some pictures of what i have to start with. I got a little excited when i got my wheel spacers and wheels so i put them on before i got any pictures, but it came with grey steel wheels. Hopefully i will get around to my suspension mods over the holiday weekend!
 

Attachments

#3 ·
Here are some pictures of the interior....not much to start with here either, but that's ok. Bench seat will be replaced with something to hold me in place a little better and a bucket seat from a Blazer for the passenger side. Door panels will be replaced eventually with ones that don't have holes and cracks in them. Floor covering will be removed since it is junk, more than likely the floor will remain bare. Also i will be taking the steering wheel from a blazer to replace this one as well since half of the foam around it is missing.
 

Attachments

#4 ·
First two mods: e-fan and open air intake. I used the popular option, the taurus fan.

Image


After some measuring and test fitting, i decided to remove the two tabs and small lip that were on the one end of the shroud.

Image


Out with the old
Image


Image


In with the new. I am very well pleased with how this fan fits the radiator. It covers 99%, only leaving one row at the top open. I used some adhesive backed weather stripping to make a good seal around the shroud and prevent the shroud from rubbing on the radiator.
Image


Image


The tab on the bottom of the shroud fits right down into the plastic tray below the radiator giving it good support and holding the bottom in tight. As for mounting, i used 4 through radiator zip ties, they hold it in place very well.
Image


Image


For top mounting of the radiator, i modified the factory top shroud with an air saw. This is also what i used to remove the tabs and lip from the end of the e-fan shroud.
Image


Image


Image


Aside from the slightly less than flawlessly straight cut, it nearly looks like a factory install. Modifying the top shroud in this way also allows for the mounting of the factory intake if someone wanted to go that route.
Image


Image


As for wiring, I am using an adjustable thermostat heat probe that is mounted at the top of the back side of the radiator under the shroud, when the thermostat reaches its set point, it triggers the 40A fan relay. My power and ground wires are all 10AWG wire to make sure they can carry the load.
Image


The completed install.
Image


As for the intake, this is a custom job made from left over pipe and couplers and clamps from installing the front mount intercooler on my TDI jetta.
Image


Image
 
#8 ·
Thanks. I was going to piece together my own kit with an inline coolant sensor because all of these type of sensors i had seen around were upwards of $100 for the kit, but then i stumbled upon this one for $23 for the sensor and the relay and all of the wires. Can't hardly beat that.
 
#12 ·
Well, things didn't go exactly as planned over the weekend. A while back, i ordered this rear bushing kit- http://www.ebay.com/itm/272063368609?_trksid=p2057872.m2749.l2649&ssPageName=STRK:MEBIDX:IT Turns out, even though it says it does, this kit will not work on my truck. It has the correct frame-shackle bushing and correct shackle-leaf bushing but the leaf-fame bushings are not even close, they are way to small. Aside from that, i just had a major lack of time and did not get much done. I have my rear end nearly prepped and ready to go in, and a few other preparations made with front suspension parts as well. Hopefully i find time to get a lot done this week, otherwise i will be not making my first autocross of the season on sunday...
 
#13 ·
I had the same problem when I got the urethane kit for my rear leaf springs. I got the wrong size. Turns out they have 2 different size leaf spring eyes. Luckily I was able to return it and get the right kit.
 
#14 ·
Here is the rear end that will be going into my truck. It's from a 4x4 bravada. Good theory says i shouldn't have to run rear spacers with this axle. Same 3.73 gear ratio as my factory rear end, but this has the locking diff as well as disc brakes vs my drum brakes. It wasn't much to look at when i started since it has been sitting in the dirt for a few years.
Image


Image


Image


Image


All stripped down, it is actually a pretty good base to start with. I acquired it on a trade deal, including my fuel costs to go get it i only have about $200 into it. It came with new rotors, pads, backing plates, and e-brake cables. I figured being in that far i may as well do wheel seals and i replaced the cover because it was terribly rusted. Also added new parking brake shoes, calipers, and brake lines.
Image


Hooray for locking diff!
Image


New backing plates
Image


New wheel seals
Image


New parking brake shoes
Image


New rotors, pads, and calipers
Image


New diff cover
Image
 
#15 ·
I had a little fun with fire, removing the bushings from the leaf springs.
Image


I was aiming to put polly bushings in, but the kit i ended up with wont work with these springs. Not sure if the zq8 springs are different eye sizes from the base model springs or if i don't actually have zq8 springs....I will have to order the correct bushing kit, looks like the 4x4 spring kits will work in these springs. And i will have to do some measuring to figure out if these springs will even work on my truck at all. Anyone have any input on if these are actually zq8 springs?

Image


Image


Image
 
#17 ·
Yea, that is the kit i need. I got the 3.2129 kit. I never even looked on their website, i just went off of info i got from searching on ebay. < right there is my mistake. Lesson learned though. At least i can still send back the wrong kit and order the correct one.
 
#18 ·
Well, I got a little more done on my truck last night. I got the new rear end installed with 3 inch blocks on stock springs for now. I have an autocross this Sunday I want to try to make it to and don't have the time to wait on bushings for the rear leafs. That and basic math says it should sit level this way now until i can get 1.5" springs for the front to match the rears.
Image


My fluid of choice, after all i am a dealer. And if anyone needs anything i would be more than happy to help them out.
Image


SPs ready to go on.
Image


With the wide tires, wide axle, and beefy shocks, it looks a lot more impressive from the rear now......not that a 2.2 is impressive, but at least it has the look and hopefully the handling ability.
Image


Rear end all done, i started in on the front. Here is the standard ball joint next to the 1" extended.
Image


The base pressed in nice, my only complaint would be that i do wish it would have pressed in a little tighter. Its not to the point that I am concerned about it staying in place, it just went in easier than pretty much any ball joint i have ever replaced.
Image


Image


I also installed polly bushings from summit in the lower control arms. This is where i ended last night because when i went to install i realized that the center pin on the front bushing needs to be drilled out slightly for the bolt to fit through, and i did not have a large enough drill bit on hand. Hopefully I will get the front suspension finished up tonight, and i have an alignment appointment tomorrow. If all goes well, testing will ensue on sunday!
Image


Variable: I am also getting my wisdom teeth out tomorrow....everyone keeps telling me i wont be able to take the pain to be off pain meds to race sunday, I am out to prove them wrong. haha!
 
#20 ·
Yea, I'm going to try to be off any major pain meds soon as possible.

Tonights goal: stay up late as necessary to finish tuck to make alignment appointment tomorrow morning

Result: blew a left front brake line as I went to pull off the lift....not real impressed about that. Better to have found out there than on the road though. Hopefully I can get the line replaced on Saturday and find a place to do an alignment.
 
#24 ·
Well, i had a few frustrations along the way, associated with working on an older rusty truck, but i did finally get the old beast back on the ground saturday, got my alignment done, and made the autocross yesterday. What a learning experience! This drives very different from anything else i have ever run before. I was rather impressed by how responsive the steering actually is. There are a few bugs to work out though and some big improvements to be made. I do know for sure that i still need to get my rear sway bar mounted on, get a bigger front sway on, change the rear bump stops so that the axle and frame match and work better together because right now they don't allow for very much travel, and i need to figure out how to make more clearance on the inner fenders or simply remove them. But overall, i am very happy with a first time out with the truck. Pics of finishing up the suspension and hopefully some video of the autocross to come.
 
#25 ·
So the current set up is this:

Front- 2" Chassis tech spindles, 1" extended lower ball joints, .5" extended upper ball joints, speedway upper arms, polyurethane lower control arm bushings, all oem type steering, and oem springs, 2.5" wheel spacers plus a 5/16 slip on spacer to clear tie rod ends with 17X9.5 wheels with 235x50-17 tires.

Rear- Bravada 4X4 rear axle with locking differential and disc brakes, 3" blocks on top of stock springs, no spacers required for perfect fitment on 17X9.5 wheels with 275x40-17 tires.

Everything all seems to jive well when it is all together. There is a bit of a bind on the top ball joint at full droop due to the lack of a droop stop, but aside from that, all is good.
Image


Image


the 1"lower ball joints that some people were interested in seem to work well.
Image


here you can see the big angle on the top ball joint at full droop, but it sits much better at static ride height.
Image


here is the finished product...for now.
Image


Image


Image


Image
 
#30 ·
It seems that most everyone who does any performance driving with these trucks mostly use vette or f-body wheels, all of which require large spacers. I'm not too worried about it, but i suppose time will tell!

What size sway bar do you have? I've been curious to see how a truck would behave with the smaller front bar with a rear bar. I've been reluctant to move up in front bar size for fear of making understeer worse (my stock bar is 29mm) but considering using a rear bar to make it lean towards oversteering hopefully, it's less scary, lol.
I have a stock front sway bar and no rear bar at this time. I know that i am getting way to much roll in the front because my tires are rubbing real hard on the tops of the inner fenders. I either need stiffer spring or stiffer sway, or both. Plus i need to remove the rear bump stop with this 4x4 axle to make enough clearance. But i think i will add the rear first since i have two of them laying around.

I'm curious what the actual advantage is over .5" on the ball joints. Do they have an upper to go with it? I would think it might create a bind depending on how far the suspension travels.


Also, if the .5" Bjs help get rid of .5" of the factory 5/8" of bumpsteer, what do the 1" tall bjs do since only 1/8" is the only amount remaining? Would there be any need for Heim joint tie rod ends at all with this setup since it would basically get rid of the remaining 1/8"? Lol just thinking out loud :haha:


Looks like you had a blast! And the truck looks like a lot of fun to drive. When I first started building the suspension on the blazer I was wanting to do autocross with it, but then I got bit by the "needs moar low" bug... Maybe next time lol
It doesn't seem to bind at all except for when the suspension travels to full droop, but the taller lowers actually help to reduce that not make it worse. Traveling in the other direction however, it would have to travel a very long ways i think, very far past the limits of the inner fender to cause any bind. When you speak of the bump steer, are you basically talking about any up or downward angle of the tie rod at static height? I'm not looking at it right this second, but if i remember correctly the tie rods are almost perfectly flat now. I really did have a lot of fun. Very different experience from anything else i have driven. I managed to outrun the guy in my group of friends who has a late 80s camaro with some goodies on it, but i have a long ways to go if i want to keep up with my other friends who have a 300zx turbo, 350z, srt4 neon, and bmw 545. Challenge excepted! I'm going to give it my best shot!