I did a search on this topic and was not able to find any related information so I decided to create this thread for those who may need some info in the future.
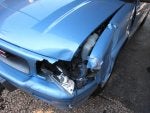
I had a damaged right front fender and found a nice replacement on CL that happened to be the same color. I did the replacement this afternoon. I thought I would write a "How to". Remember the instructions below are related to removing the passenger side fender. Should be similar for a driver side removal. Sorry, I didn't take any pics.
Tools needed for the job:
15mm socket, 3/8 drive
13mm deep socket, 3/8 drive
13mm gearwrench
13mm open end/box end wrench
10mm socket , 1/4 drive
2 long extensions, 3/8 drive
standard "blade" screwdriver
pliers
trim removal tool
You will need to remove the grill, headlight assemblies and front bumper. The grill snaps out, just be careful not to break the tabs when prying them out. I used a trim removal tool to pry mine loose. The front bumper is held on with six 15mm bolts, four on the front and one on the bottom side of each side. These bolts can be accessed after the grill and head light assemblies have been removed. The bumper has to be removed because each fender has a stud at the front that locks into the bumper. The fender will not release if the bumper is not removed.
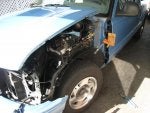
The hood will need to be detached at the hinge on the side you plan to work on. This will be done using a 13mm wrench and 13mm gearwrench. If possible total removal of the hood would be prefered, but isn't required. To remove the hinge bolt the end of the cowl cover must be removed to access this area. The cowl is the three plastic pieces that cover the windshield wipers. This is done by removing the push pin, which looks like a philips screw. You can attempt to unscrew it, but most likely you will have to pry it or pull it out. Then unsnap the outer edge of the piece from the body.
The battery will need to be removed to allow access to a bolt that fastens the fender to the front support. Remove the ECM from the top of the coolant tank. This is done by removing three 10mm bolts. Push the ECM aside so that you can see the inside area of the fender. There are wire connecters that will need to be removed. I used my trim removal tool to pry the fasteners loose. You will need to disconnect the horn as well. Look at the battery tray area (battery removed) and you will see two silver 10mm bolts. These bolts hold a bracket with a couple of relays attached to the inside cavity of the fender. Remove these two bolts and the relays will come out. The last thing to disconnect will be the antenna cable. It simply unplugs.
Now you can move to the meat and potatoes which is removing the fender. Open the passendger door. Look into the area where the hinge is located. At the top you will see a 13mm bolt and at the bottom you will see another one. These bolts need to be removed. You will most likely need to use your 3/8 extentions put together to allow you access to these bolts. Crawl under the right side and you will find another 13mm bolt that fastens the bottom edge of the fender to the chasis. This bolt is important, mainly because I forgot to remove it and could not figure out why the fender would not come off. There are two more 13mm bolts on the top edge of the fender near the hood hinge. Remove these two bolts. There is one 13mm bolt near the battery tray that must be removed (mentioned above). There is a 13mm bolt on the top edge of the fender above where the head lights would be, remove this bolt. At the front bottom edge of the fender there are two 13mm bolts. One on the immediate front and one just below on the side. Remove these bolts. Next you will need to remove the 13mm bolts from the inner fender well that attach to the fender. These are accessed from the wheel well and can be done with out removing the wheel. Once these have been removed the fender should come right off. If it doesn't then check all bolt locations to ensure they've all been removed.
Remove the old fender and replace with the new fender. Do everything in reverse and you should have it all buttoned up nice. This job took me about two hours start to finish. I could probably cut some time off now that I've done it once. I tried to remove the fender without removing the front bumper and this added time. Good luck on the repair!
I had a damaged right front fender and found a nice replacement on CL that happened to be the same color. I did the replacement this afternoon. I thought I would write a "How to". Remember the instructions below are related to removing the passenger side fender. Should be similar for a driver side removal. Sorry, I didn't take any pics.
Tools needed for the job:
15mm socket, 3/8 drive
13mm deep socket, 3/8 drive
13mm gearwrench
13mm open end/box end wrench
10mm socket , 1/4 drive
2 long extensions, 3/8 drive
standard "blade" screwdriver
pliers
trim removal tool
You will need to remove the grill, headlight assemblies and front bumper. The grill snaps out, just be careful not to break the tabs when prying them out. I used a trim removal tool to pry mine loose. The front bumper is held on with six 15mm bolts, four on the front and one on the bottom side of each side. These bolts can be accessed after the grill and head light assemblies have been removed. The bumper has to be removed because each fender has a stud at the front that locks into the bumper. The fender will not release if the bumper is not removed.
The hood will need to be detached at the hinge on the side you plan to work on. This will be done using a 13mm wrench and 13mm gearwrench. If possible total removal of the hood would be prefered, but isn't required. To remove the hinge bolt the end of the cowl cover must be removed to access this area. The cowl is the three plastic pieces that cover the windshield wipers. This is done by removing the push pin, which looks like a philips screw. You can attempt to unscrew it, but most likely you will have to pry it or pull it out. Then unsnap the outer edge of the piece from the body.
The battery will need to be removed to allow access to a bolt that fastens the fender to the front support. Remove the ECM from the top of the coolant tank. This is done by removing three 10mm bolts. Push the ECM aside so that you can see the inside area of the fender. There are wire connecters that will need to be removed. I used my trim removal tool to pry the fasteners loose. You will need to disconnect the horn as well. Look at the battery tray area (battery removed) and you will see two silver 10mm bolts. These bolts hold a bracket with a couple of relays attached to the inside cavity of the fender. Remove these two bolts and the relays will come out. The last thing to disconnect will be the antenna cable. It simply unplugs.
Now you can move to the meat and potatoes which is removing the fender. Open the passendger door. Look into the area where the hinge is located. At the top you will see a 13mm bolt and at the bottom you will see another one. These bolts need to be removed. You will most likely need to use your 3/8 extentions put together to allow you access to these bolts. Crawl under the right side and you will find another 13mm bolt that fastens the bottom edge of the fender to the chasis. This bolt is important, mainly because I forgot to remove it and could not figure out why the fender would not come off. There are two more 13mm bolts on the top edge of the fender near the hood hinge. Remove these two bolts. There is one 13mm bolt near the battery tray that must be removed (mentioned above). There is a 13mm bolt on the top edge of the fender above where the head lights would be, remove this bolt. At the front bottom edge of the fender there are two 13mm bolts. One on the immediate front and one just below on the side. Remove these bolts. Next you will need to remove the 13mm bolts from the inner fender well that attach to the fender. These are accessed from the wheel well and can be done with out removing the wheel. Once these have been removed the fender should come right off. If it doesn't then check all bolt locations to ensure they've all been removed.
Remove the old fender and replace with the new fender. Do everything in reverse and you should have it all buttoned up nice. This job took me about two hours start to finish. I could probably cut some time off now that I've done it once. I tried to remove the fender without removing the front bumper and this added time. Good luck on the repair!